
RIFLEMEN!!
So, I decided to add some Twin Linked Auto Cannon (TLAC) -Rifleman arms to my dreadnoughts, as I don't own any Predators, and I want some long range anti-transport capability. Seeing that these Dreadnought configs are all the rage these days, I started to look for economical and cool (read:. cheap and easy) ways to add some. My search fu was weak, I saw plenty of "Here is my Dread!" threads and posts, but no How-to. So, without further ado, here is my take on it.
Materials:
1 x Dreadnought Lascannon arm
1 x Dreadnought Missle Launcher arm
4 x Imperial Guard Auto Cannon and ammo drum sets.
-This is best from the Heavy weapon team set. You will only get three from a set, so getting two sets worth will do three arms, four sets will pimp out your three heavy support TLAC Dread choices.
-These are best found on ebay, your favorite bitswaping IG player, or your FLGS.
* Note. Trust me from experience, don't buy the autocannon from the Sentiel kit. The pics usually taken alone and with no real size comparison, and for a non IG player may look longer then they are. This autocannon is quite shorter then what you want. I made that mistake already of grabbing one for my fourth cannon for a set, now I have a short cannon with no where to stick it. Yeah, laugh it up fuzz-ball.

Step 1: Chop em' down.
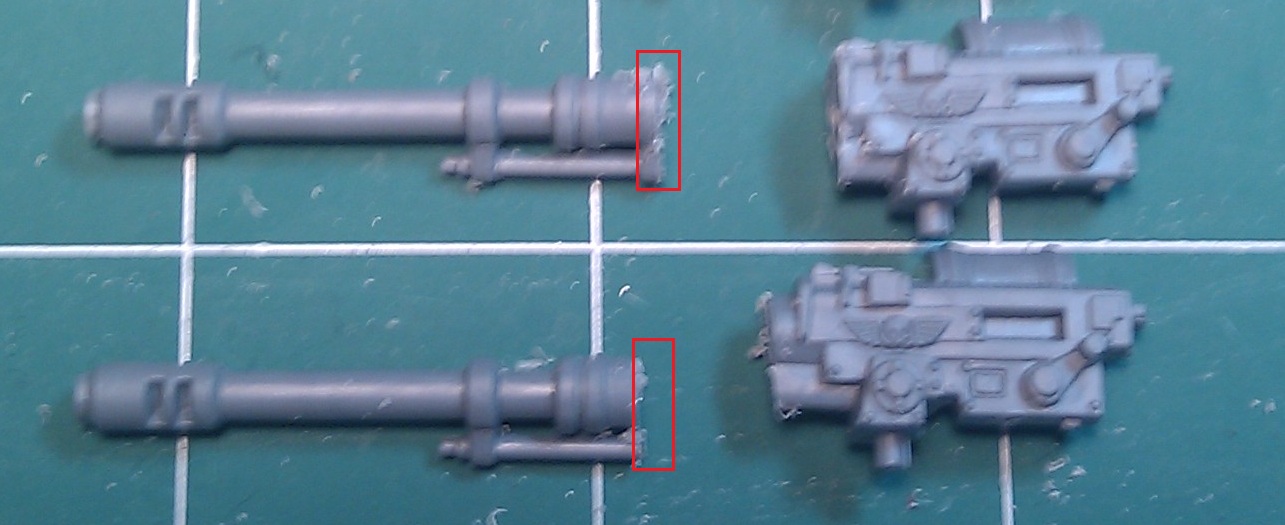
The first thing you will need to do is cut the Auto Cannons, the Las Cannon, and the ammo drums. Cut them and clean them as shown below:
- Cut the AutoCannons right after the weapon housing, just as the barrels begin
- Cut the handles off of the ammo drums. You will have a thin one with two posts used to glue onto for the side of the cannon, and a large one with a lid detail on the flat side, used as a spare drum.

- Cut the Lascannon right as the cannon begins, after the coupling piece.
- [Optional] As a option, you can remove the entire lower "Support" piece below the barrels. I cut mine away, but if it's not in the way you can just leave it there.

- [Optional] I trimmed one of the cannons on each arm just a tiny but. the reason i do this is to allow the top barrel to look slightly shorter, giving a staggered look to the barrels.
With the AutoCannons cut and the LasCannon arm ready to go its a simple file, clean, and glue.
Like so:
- The cut and ready LasCannon arm.

- Gluing on the new Autocannon top cannon. (This is the shorter trimmed one for the staggered look)

- Gluing on the new Autocannon bottom cannon. (The full size one)

You may notice that I added a small piece of tubing to the bottom of the lowest right cannon. The metal pipe looked odd floating off the bottom of the arm. Now if you did NOT cut off the support from step one, this may not be necessary. Live and learn.

Step 3: Left Arm.
First thing we need to do is prepare the missle launcher arm.
- Scape, cut, "convince" off the missle exhaust vents.


- With the missle launcher cleaned and good to go, Line up your arms and mark your cannon placement.

- And just like earlier, glue on your barrels short one on top, and be sure to keep them level, plumb, clean, and straight.
- Finally add your ammo barrels to the side of the arm. You may notice that the top barrel will hit part of the top sight, so a quick trim later and its good to go.


- And here is the final result of the two cannon arms.


So there you have it, my easy and lazy take on setting up your TLAC Dreads. Probably about 12-15 bucks on the bits, with shipping which is half price of two Forgeworld ones, let alone across-the-pond shipping. I hope this helped you on your Dreadnought conversion.
If any of you have done the same or found other methods, feel free to comment and link to your own blog or post.
-Mike
I did this very thing for my dreadnought and used the Aegis defense line guns. Much cheaper than the actual bits and the look is the same... but I didn't do as much work as you did here. I just glued the bits in place.
ReplyDeleteNice job on these.
Here's the link to my post showing my results:
http://fromthewarp.blogspot.com/2010/03/mortis-pattern-dreadnought-conversion.html
Very good tutorial. My current dread has 1 TLd Auto arm from Forgeworld. Waste of money now that I look at what you did. Plastic is by far easier to work with than resin and looks better in my opinion.
ReplyDeleteRon, took a look at yours as well, very sweet. Both of these look perfect and the parts are really accessible.
I looked into the Aegis Kit, but had bad luck looking for just the Guns for a reasonable price, and knowing me I would spend the full wad and get the whole kit, making me want to do terrain with the shield bits. Then I would be doing terrain. We don't want that. I'm way too flighty and now I'm thinking of ways to use the shield bits for AS conversions... I blame Ron. And ADorn too...just because I can.
ReplyDeleteThose look great. Anything to bring back a dash of Battletech. Always loved panthers. . . .
ReplyDeletesweet! Lovely and simple but still fantastically effective!
ReplyDelete